11 min to read
iOS All The Things - Part I

Agenda of iOS Pentesting:
Intro
Hey Geeks, and welcome to our ultimate guide! Ever wondered how hackers find weaknesses in ios apps, and how we can stop them? You’re in the right place.
This article is your complete roadmap, divided into more than one easy-to-follow part. We’ll break down everything about iOS penetration testing, from the basic concepts to the advanced tricks. And the best part? We’ll finish with a hands-on lab where we’ll solve challenges together, step-by-step.
So, whether you’re just curious or building your skills, let’s dive in and unlock the secrets of iOS security!
Now that we’re warmed up, let’s get a bit more specific. From a technical standpoint, iOS application penetration testing is a structured assessment of an iOS app’s security posture. It involves analyzing the app’s binary, its runtime behavior, and its communication with backend services to identify vulnerabilities that could lead to unauthorized access, data leakage, or compromise of user privacy.
This process typically covers several core areas:
-
Static Analysis (SAST): Examining the app’s code without executing it, often by decompiling the IPA file, to find hardcoded secrets, insecure code patterns, and logic flaws.
-
Dynamic Analysis (DAST): Testing the app while it’s running on a device or simulator. This includes intercepting network traffic (with tools like MITMproxy & Burp), inspecting runtime memory, and manipulating function calls to test for vulnerabilities in real-time.
-
Reverse Engineering: Using tools like Hopper or Ghidra to disassemble the application binary to understand its inner workings, bypass client-side protections, and uncover hidden functionality.
-
Network Security: Assessing the encryption of data in transit (e.g., TLS implementation), testing API endpoints for common vulnerabilities, and validating certificate pinning.
The goal is to emulate a real-world attacker’s methodology to discover and help remediate risks, ensuring the app adheres to security best practices and protects sensitive user data effectively.
iOS Architecture
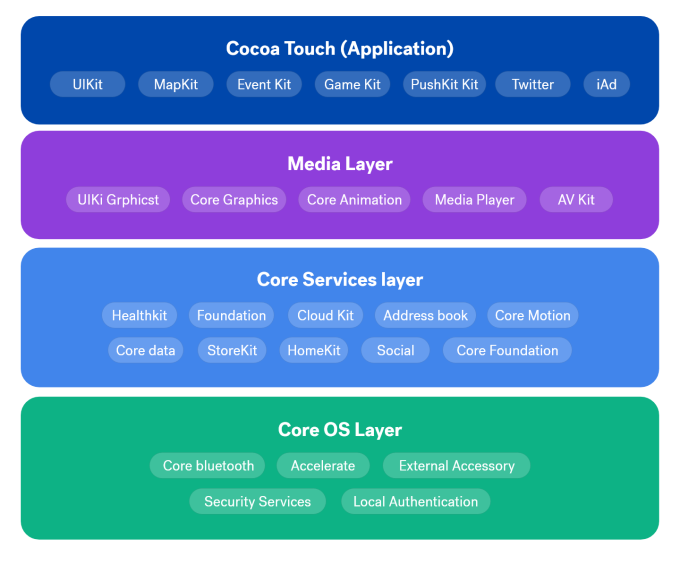
The first layer is the Core OS Layer. It is based on a Unix-like kernel, from which iOS inherits powerful low-level features and capabilities, such as a command-line interface and shell.
This layer acts as the direct conduit to the device’s hardware components, including Bluetooth, Wi-Fi, and various sensors. These components are accessed through secure, structured APIs.
The second layer is the Core Services Layer. It provides essential system services and acts as a intermediary between higher-level layers and the Core OS Layer. It does this by using the structured APIs provided by the Core OS Layer to request access to hardware components like Bluetooth, filesystem, and network connections.
For example, to access Bluetooth, a service in the Core Services layer would use its designated API to send a request down to the Core OS layer. The Core OS layer then translates that request into the specific instructions needed to activate the Bluetooth hardware.
The third layer is the Media Layer. This layer is responsible for all of the device’s graphics, audio, and video capabilities. It contains the powerful frameworks that applications use to display animations, play sounds, render 2D and 3D graphics, and play video files. While it provides the visual and auditory “style,” the actual user interface elements (like buttons and screens) are built using the higher-level Cocoa Touch layer.
The fourth layer is the Cocoa Touch Layer. This is the layer that users directly interact with. It provides the essential frameworks and infrastructure for building an app’s user interface, including multi-touch events, push notifications, and key app components like windows, views, and buttons. User-facing applications—such as Twitter, Messages, and Photos—are all built using the APIs and tools provided by this layer. It serves as the final, user-friendly abstraction over the complex lower layers of the iOS architecture.
Important Note: Apple’s iOS is a closed-source environment, unlike Android. You cannot install a modified iOS system because the hardware will reject it. All hardware components are cryptographically signed by Apple. Only the original iOS system has the correct digital certificate to communicate with the signed hardware. During boot, a “secure boot chain” process validates the iOS signature. If the signature is valid, the system boots; if not, it fails. This ensures only genuine Apple software can run on the device.
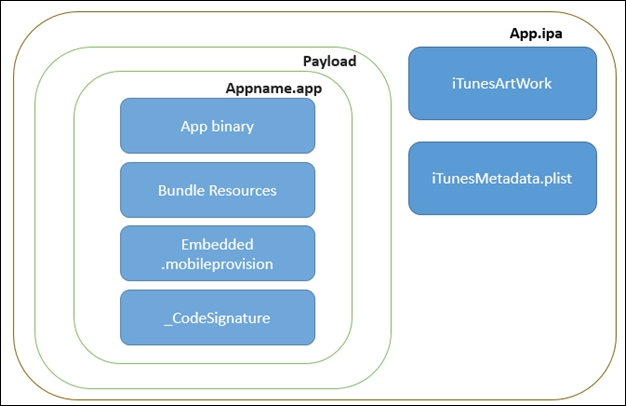
IPA Architecture
An IPA file is the application package format for iOS, functionally equivalent to an APK package on Android. When you extract an IPA package (e.g., test.ipa), you obtain its core contents. The key components include:
Info.plist
This is the Information Property List file, which serves a role similar to the AndroidManifest.xml in Android. It contains crucial metadata about the application, including:
- The application’s display name (CFBundleDisplayName)
- The bundle identifier (CFBundleIdentifier)
- The minimum iOS version it requires to run (MinimumOSVersion)
- The application’s version and build numbers
The Executable (Mach-O Binary)
Extracting the IPA yields the main application executable. This is a Mach-O (Mach Object) file. This binary is the compiled, machine-code version of the application’s source code. Unlike a decompiled Android APK, which can often yield readable Java or Kotlin code, this Mach-O binary contains compiled code that cannot be directly read. To analyze it, you must use reverse engineering tools like Ghidra, Hopper Disassembler, or IDA Pro to disassemble it into assembly code. The goal is to analyze this assembly to understand the program’s logic and perform dynamic analysis during runtime.
This executable is protected by modern security controls such as:
- ASLR (Address Space Layout Randomization): Randomizes memory addresses to make exploits unreliable.
- DEP/NX (Data Execution Prevention/No-eXecute): Marks certain memory segments as non-executable, preventing code from running in data regions.
Important Tip: The Decryption Hurdle of Any application downloaded from the official App Store has its main binary encrypted by Apple to protect intellectual property. If you try to analyze an App Store app directly with a disassembler, the tools will fail because they cannot read the encrypted code. To bypass this, a common technique is to run the app on a jailbroken device and dump the decrypted binary from memory (using tool like frida-ios-dump) before performing static analysis.
Frameworks Folder
This directory contains the libraries the application depends on. This includes:
- Dynamic Libraries: Custom frameworks developed for the app’s specific needs.
- System Libraries: Built-in iOS libraries (like libc.dylib) that provide standard functions.
Embedded.mobileprovision
This is a provisioning profile file. It contains the code-signing certificates and entitlements that authorize the app to run on specific devices or use certain Apple services. It also defines security policies and is crucial for understanding the app’s capabilities.
Sandbox and Permissions (Entitlements)
Sandbox: The core mechanism that prevents applications from accessing each other’s data. This is a mandatory access control system enforced by the iOS kernel that isolates each application into its own dedicated container. This design ensures that an app cannot read, write, or modify the contents of any other app’s container.
This isolation is physically implemented through three primary directory structures on the filesystem:
- The System Application Container (/var/Applications/): This path contains the bundles for Apple’s pre-installed system applications, which are separate from user-installed apps.
- The App Bundle Container (/var/containers/Bundle/Application/): This directory houses the actual application package (the .app folder) for all user-installed apps. Its contents are primarily read-only and include the application’s compiled binary, embedded resources, frameworks, and its Info.plist file.
- The Data Container (/var/mobile/Containers/Data/Application/): This is the most important directory for an app’s dynamic data. Each app has a corresponding folder here for its read-write data, including user documents, databases, preferences, and caches. This directory is the strict equivalent of Android’s /data/data/ path and is rigorously protected from access by other apps.
Permissions (Entitlements): The sandbox acts as a default-deny prison for applications. Entitlements are the signed permissions—embedded in the app’s code signature and provisioning profile that grant an app specific exceptions to these restrictions. They are the legal passes that allow an app to access protected resources like the camera, microphone, or network, outside of its own container.
Examples of Entitlements:
- com.apple.security.network.client → Allows outgoing network connections.
- com.apple.security.device.camera → Allows access to the camera.
- com.apple.security.device.microphone → Allows access to the microphone.
- com.apple.security.device.bluetooth → Allows access to Bluetooth.
Programming iOS Apps
Developing applications for iOS is primarily done using two programming languages: Objective-C and Swift.
| Language | Definition |
|---|---|
| Objective-C | This is an object-oriented programming language built as an extension of the standard C language. It was the primary language for iOS and macOS development for many years. While still maintained and used, especially in older codebases, it has largely been superseded by Swift for new projects. |
| Swift | Introduced by Apple in 2014, Swift is a modern, fast, and type-safe programming language designed specifically for iOS, macOS, and other Apple ecosystem development. Its cleaner syntax and focus on safety make it the current recommended and most popular language for building new iOS applications. |
The Primary Development Tool: Xcode
The central hub for iOS development is Xcode, which is directly comparable to Android Studio for Android development.
A Quick Tour of Swift:
Variable & constants
Swift uses let to declare constants and var to declare variables. Similar to languages like C, Swift uses these identifiers to store and refer to values in memory.
import Foundation

// Declare a variable that can change its value
var myVariable = 42
myVariable = 50

// Declare a constant that cannot be changed
let myConstant = 42
// myConstant = 50  // This would cause a compile-time error

print(myVariable) // equal 50
print(myVariable + myConstant) // equal 92
Swift is a type-safe language, which means it needs to know what type of data a variable can hold. While it can often infer the type automatically (called type inference), you can also explicitly specify it during declaration to ensure precision and clarity.
import Foundation

//Delcare the type
var test:String = "Ahmed"
print(test) //Ahmed
Control Statements
Swift provides powerful control flow statements that let you conditionally execute code. The if statement is used for simple checks, while the switch statement is exceptionally powerful in Swift, capable of matching complex patterns and conditions far beyond simple integer values.
import Foundation

// If statements
let score = 85
if score > 80 {
    print("Great job!")
}

// For-in loop over an array
let names = ["Ahmed", "Ayman", "Ahmed"]
for name in names {
    print("Hello, \(name)!")
}

// Switch statement (powerful in Swift)
let vegetable = "red pepper"
switch vegetable {
case "celery":
    print("Add some raisins.")
case "cucumber", "watercress":
    print("That would make a good tea sandwich.")
case let x where x.hasSuffix("pepper"):
    print("Is it a spicy \(x)?") // This will print for "red pepper"
default:
    print("Everything tastes good in soup.")
}
Function
In Swift, a function is a self-contained block of code designed to perform a specific task, making it a fundamental building block for organizing and reusing code in iOS applications.
import Foundation

// Function
func test(x:String , y:String) -> String{
    return "Hi, \(x) \(y)"
}

var z = test(x:"Ahmed" , y:"Ayman")
print(z) // Hi, Ahmed Ayman
Class
In Swift, a class is a blueprint for creating objects. It encapsulates data (in the form of properties) and behavior (in the form of methods) that together describe a specific concept or entity.
import Foundation

// Class
class test{
    var num = 0
    func x() -> String{
        return "Done!"
    }
}

// Variable y is inherited all properties belong to class test()
var y = test()
// Can use any method or object in that class
print(y.num) // 0
print(y.x()) // Done!
Important Advice: A highly effective way to sharpen your penetration testing skills is to analyze intentionally vulnerable applications. Apps like DIVA-v2 are designed with security flaws for educational purposes.
Conclusion
That concludes Part one of our journey into iOS pentesting. We’ve laid the foundation by exploring the architecture, the IPA structure, and Swift Programming.
Just like Chrollo meticulously studies his opponents’ abilities before a fight, a successful pentester must first master the known system to exploit its unknown weaknesses.
Stay tuned. The real mission is about to begin.
Quote From Chrollo: In order to understand the unknown, one must first become acquainted with the known.