27 min to read
iOS All The Things - Part III

Agenda of iOS Pentesting:
- Intro
- Runtime Manipulation: Mastering Frida & Objection
- iOS Reverse Engineering
- Network Communication
- Logs
- Conclusion
Intro
Now, in Part 3, we put that knowledge to the test. This is where we transition from passive observation to active engagement, performing a real-world penetration test against an iOS application.
Our journey will take us deep inside the application’s runtime behavior, where we’ll learn to manipulate it in real-time with powerful tools like Frida and Objection. We will then reverse engineer its binary to uncover hidden logic and vulnerabilities. We’ll intercept and dissect its network communications, and finally, we’ll scour its cached data and logs for exposed sensitive information.
Runtime Manipulation: Mastering Frida & Objection
In iOS penetration testing, Runtime Manipulation is one of the most powerful techniques at your disposal. It allows you to interact with and modify a running application without needing its original source code. This is where Frida and Objection become essential tools in your arsenal.
This requires a physical USB connection between your jailbroken iOS device and your Linux machine, which serves as the vital link for tools like Frida to control the target application.
Basic Workflow:
a. Start the target app on your jailbroken device.
b. Inject Frida scripts to hook into interesting functions.
c. Use Objection for quick security assessment and bypasses.
d. Monitor and manipulate the app’s behavior in real-time
Frida
It is a dynamic instrumentation toolkit. In simple terms, it lets you inject your own scripts into running applications. Think of it as giving you a “remote control” for any app. you can:
- Change what the app does while it’s running.
- Bypass security checks (like pinning or root detection).
- Monitor function calls and method arguments.
- Modify return values of functions.
Once you have a Frida script running inside an application, you can interact with the Objective-C runtime, which is the backbone of most iOS apps. This is incredibly powerful for discovering and manipulating the app’s classes and methods on the fly.
# -U: Connect to a USB device
# -f: Spawn the app with this package name
# -n: Attach to the process with this name
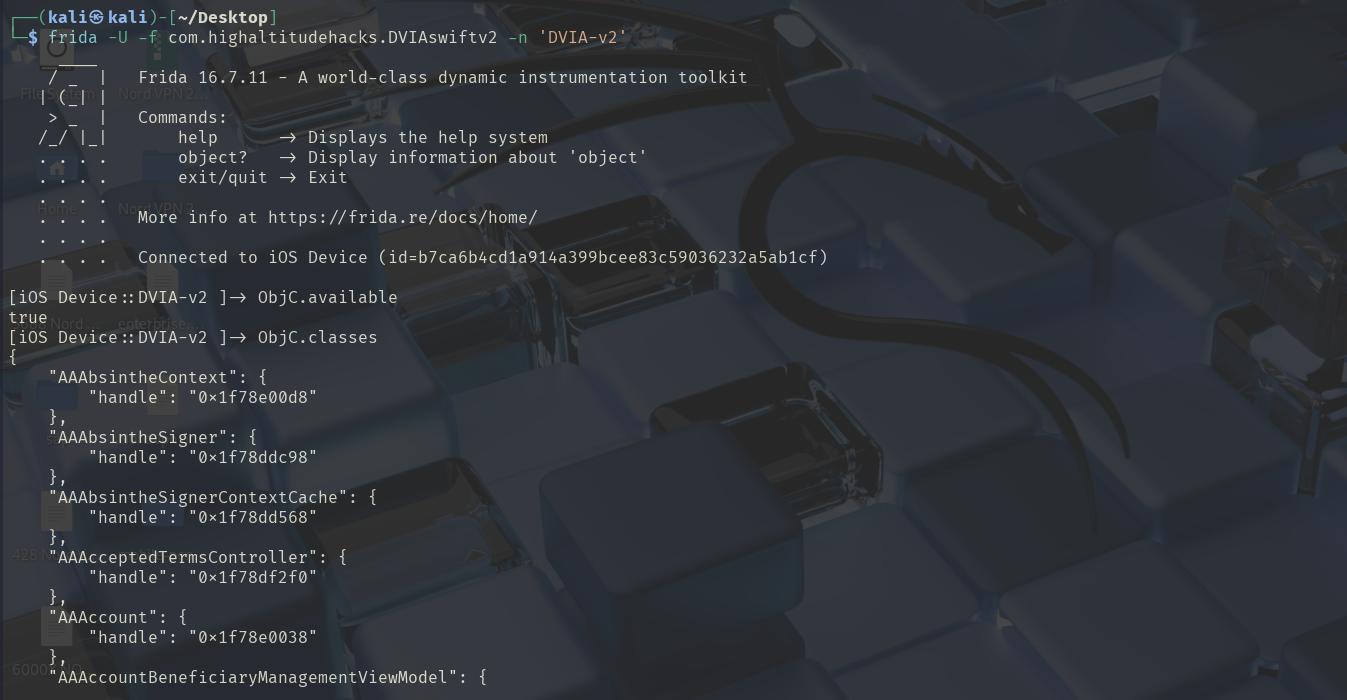
frida -U -f com.highaltitudehacks.DVIAswiftv2 -n 'DVIA-v2'
Here are fundamental commands:
-
ObjC.available: This is a crucial check you should perform at the beginning of your scripts. It returns true if the Objective-C runtime is accessible within the target process, and false if it is not. This confirms you are in the right context before trying to execute any other Objective-C commands. -
ObjC.classes: This command provides a goldmine of information. It returns a list of all Objective-C classes currently loaded in the application’s memory. This is your starting point for understanding the app’s structure and finding interesting targets to hook and manipulate. -
another commands:
frida-trace: is a dynamic tracing tool built on top of Frida that automatically instruments and traces function calls in applications. It’s designed for quick and easy function monitoring without writing custom scripts.


# -U: Connect to a USB device
# -f: Spawn the app with this package name
# -i: Trace functions containing "jailbreak" in their name

frida-trace -U -f com.highaltitudehacks.DVIAswiftv2 -i "*jailbreak*"

# -m: To get all specific method
# *: Enable pattern matching for function names
# -n: Attach to the process with this name

frida-trace -U -n "DVIA-v2" -m "*[jailbreak* *]"
frida-discover: is a specialized tool in the Frida suite designed for automated function discovery in binaries and applications. It helps you find interesting functions to trace or hook when you don’t know what you’re looking for.
# discover all classes and methods of the app
# -U: Connect to a USB device
# -n: Attach to the process with this name

frida-discover -U -n "DVIA-v2"
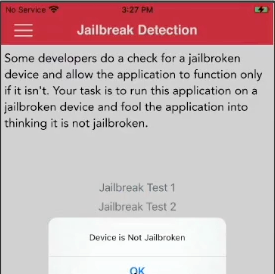
Example: Using Frida Scripts to bypass Jailbreak
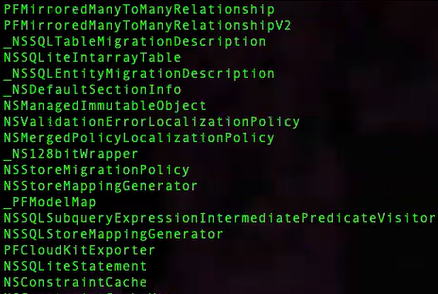
a. Get all classes of app
// Iterate through all available Objective-C classes in the runtime
// This loop goes through every class that Frida can discover in the Objective-C runtime
for (var className in ObjC.classes) {

    // Verify that the property actually belongs to ObjC.classes object
    // This prevents iterating over inherited properties from the prototype chain
    if (ObjC.classes.hasOwnProperty(className)) {

        // Print the class name to the console
        // This reveals all Objective-C classes currently loaded in the target application
        console.log(className);
    }
}
# run the script on the app to see all classes
frida -U -l viewclasses.js DIVA-V2
b. Get all methods of specific class like “JailbreakDetection”
// Log startup message to indicate script execution has begun
console.log("[*] Started: Find All Methods of a Specific Class");

// Check if Objective-C runtime is available in the current context
if (ObjC.available) {
    try {
        // Define the target class name we want to inspect
        var className = "JailbreakDetection";

        // Access all methods of the specified class
        // The $methods property contains an array of all instance and class methods
        var methods = ObjC.classes[className].$methods;

        // Iterate through each method in the class
        for (var i = 0; i < methods.length; i++) {
            try {
                // Print each method name with a prefix for visibility
                // This reveals all available methods in the JailbreakDetection class
                console.log("[-] " + methods[i]);
            } catch(err) {
                // Handle exceptions for individual method access
                // This prevents one faulty method from breaking the entire loop
                console.log("[1] Exception1: " + err.message);
            }
        }
    } catch(err) {
        // Handle exceptions for class-level access failures
        // This occurs if the class doesn't exist or can't be accessed
        console.log("[1] Exception2: " + err.message);
    }
} else {
    // This branch executes if the script runs in a non-Objective-C environment
    console.log("Objective-C Runtime is not available!");
}

// Log completion message to indicate script has finished execution
console.log("[*] Completed: Find All Methods of a Specific Class");
c. Grep on the specific method

frida -U -l viewmethods.js DIVA-V2 | grep -i 'jailbreak\|jailbroken'
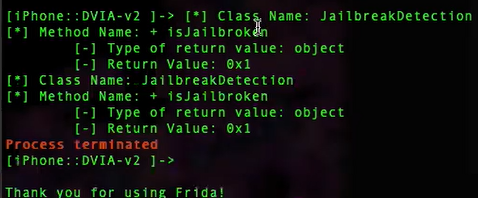
d. Get the original return value
// Check if Objective-C runtime is available
if (ObjC.available) {
    try {
        // Define the target class name containing the method we want to hook
        var className = "JailbreakDetection";

        // Define the specific method to hook
        // The "+" indicates a CLASS method, "-" would indicate INSTANCE method
        var funcName = "+ isJailbroken";

        // Get reference to the target method we want to intercept
        // This accesses the method from the Objective-C runtime
        var hook = ObjC.classes[className][funcName];

        // Use Frida's Interceptor to attach to the method implementation
        // This will hook the method and execute our code when it's called
        Interceptor.attach(hook.implementation, {
            // 'onLeave' callback executes AFTER the original method completes
            // This is where we can inspect the return value
            onLeave: function(retval) {
                // Log basic information about the hooked call
                console.log('[*] Class Name: ' + className);
                console.log('[*] Method Name: ' + funcName);

                // Log the data type of the return value for debugging
                console.log('\t[-] Type of return value: ' + typeof retval);

                // Log the actual return value, this is crucial for analysis
                // For jailbreak detection, this might be a boolean (true/false)
                console.log('\t[-] Return Value: ' + retval);

                // NOTE: This is where you could MODIFY the return value
                // For example: retval.replace(0x1) to always return true
            }
        });

    } catch(err) {
        // Handle exceptions that might occur during hook setup
        // Common errors: class not found, method doesn't exist, permission issues
        console.log('[!] Exception: ' + err.message);
    }
} else {
    // This executes if not in an Objective-C environment
    console.log("Objective-C Runtime is not available!");
}
frida -U -l retval.js DIVA-V2
e. overwrite on the return value to bypass it

// Check if Objective-C runtime is available
if (ObjC.available) {
    try {
        // Define the target class name for jailbreak detection
        var className = "JailbreakDetection";

        // Define the specific class method to hook - "+" indicates class method
        var funcName = "+ isJailbroken";

        // Get reference to the target method we want to intercept
        // This accesses the method from the Objective-C runtime
        var hook = ObjC.classes[className][funcName];

        // Create a pointer to the value 0x0 (FALSE) that we'll use to overwrite return value
        var newretval = ptr("0x0");

        // Hook the method implementation using Frida's Interceptor
        Interceptor.attach(hook.implementation, {
            // This function executes AFTER the original method completes
            onLeave: function(retval) {
                // Log information about the hooked method call
                console.log('[*] Class Name: ' + className);
                console.log('[*] Method Name: ' + funcName);

                // Display the data type of the original return value
                console.log('\t[-] Type of return value: ' + typeof retval);

                // Show the original return value before modification
                console.log('\t[-] Original Return Value: ' + retval);

                // Replace the return value with our desired value (0x0 = FALSE)
                // This bypasses jailbreak detection by always returning "not jailbroken"
                retval.replace(newretval);

                // Confirm the new return value that was set
                console.log('\t[-] New Return Value: ' + newretval);
            }
        });
    } catch(err) {
        // Handle any exceptions that occur during the hooking process
        console.log("[1] Exception2: " + err.message);
    }
} else {
    // This executes if Objective-C runtime is not available
    console.log("Objective-C Runtime is not available!");
}
frida -U -l overwrite.js DIVA-V2
Note: Instance Method(-): An instance of the class (
[obj method]). Class Method: The class itself ([ClassName method]).
Objection
It is a runtime mobile exploration toolkit built on top of Frida. It simplifies many common tasks. that provides ready-to-use commands for:
- Bypassing SSL pinning with a single command.
- Disabling common security controls.
- Exploring the app’s data storage.
- Dumping keychain information
Once you have connected to an application using Objection, you can immediately begin exploring the Objective-C runtime, which forms the core of most iOS apps. Objection simplifies this process, allowing you to discover and interact with the app’s classes and methods through an intuitive command-line interface.
# -g: Connect to a process with PID (Process ID) 2134
# explore: Start an interactive exploration session

objection -g 2134 explore
Here are fundamental commands:
env: Find the paths where the application is stored inside the device.ios bundles list_bundles: List bundles of the application.ios bundles list_frameworks: List external frameworks used by the application.memory list modules: List loaded modules in memory.memory list exports DVIA-v2: Exports of a loaded module.memory search "secret" --string: Search for secrets in memory.ios jailbreak disable: Bypass jailbreak detection.ios sslpinning disable: Bypass SSL pinning.ios cookies dump: Extract cookies.ios keychain dump: Dump keychain “keychain is a secure storage system for sensitive information like passwords, credit card details, and cryptographic keys, accessible to apps and the user”.ios monitor crypto: monitors cryptographic operations in real-time.
Creating an Objection Script:
# create script
nano disable_security.objection

# put commands in script like
ios jailbreak disable
ios sslpinning disable

# run objection script
objection -g 2134 explore --script disable_security.objection
Example: Using Objection to bypass jailbreak
a. List loaded classes
ios hooking list classes
b. List all methods
ios hooking list class_methods JailbreakDetection
c. Hook into the isJailbroken method of the JailbreakDetection class and inspect its parameters or return values
ios hooking watch method "+[JailbreakDetection isJailbroken]" --dump-args --dump-return
d. Patching a method at runtime “means modifying the method’s implementation to change its behavior or return values dynamically”
ios hooking set return_value "+[JailbreakDetection isJailbroken]" false
iOS Reverse Engineering
iOS reverse engineering is the process of analyzing a compiled application to understand its original source code, logic, and behavior. Since you rarely have access to the original source code during a penetration test, reverse engineering becomes your primary method for uncovering hidden vulnerabilities, backdoors, and security flaws.
The Reverse Engineering Process:
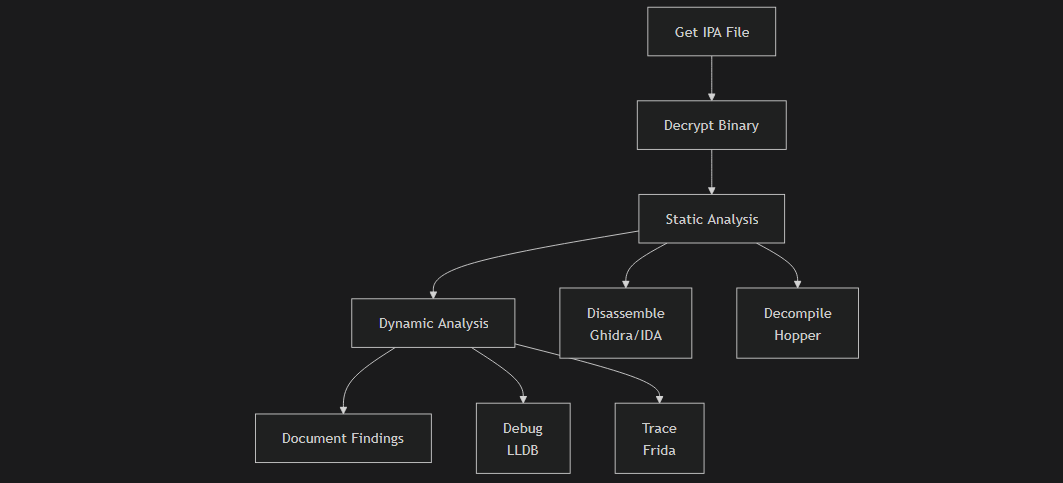
Decompiling The APP:
Mangling is the compiler’s process of encoding readable function/class names into unique, compact symbols for the binary.
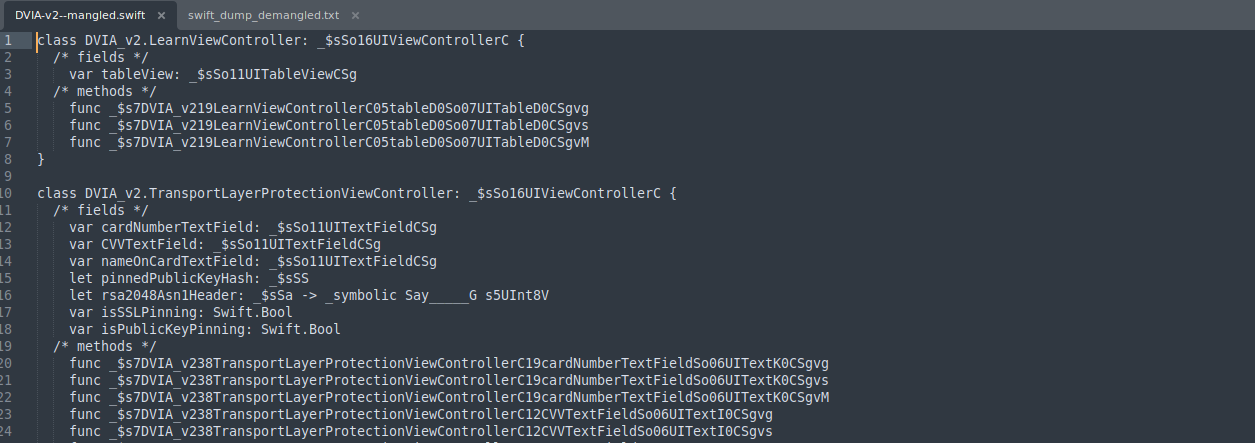
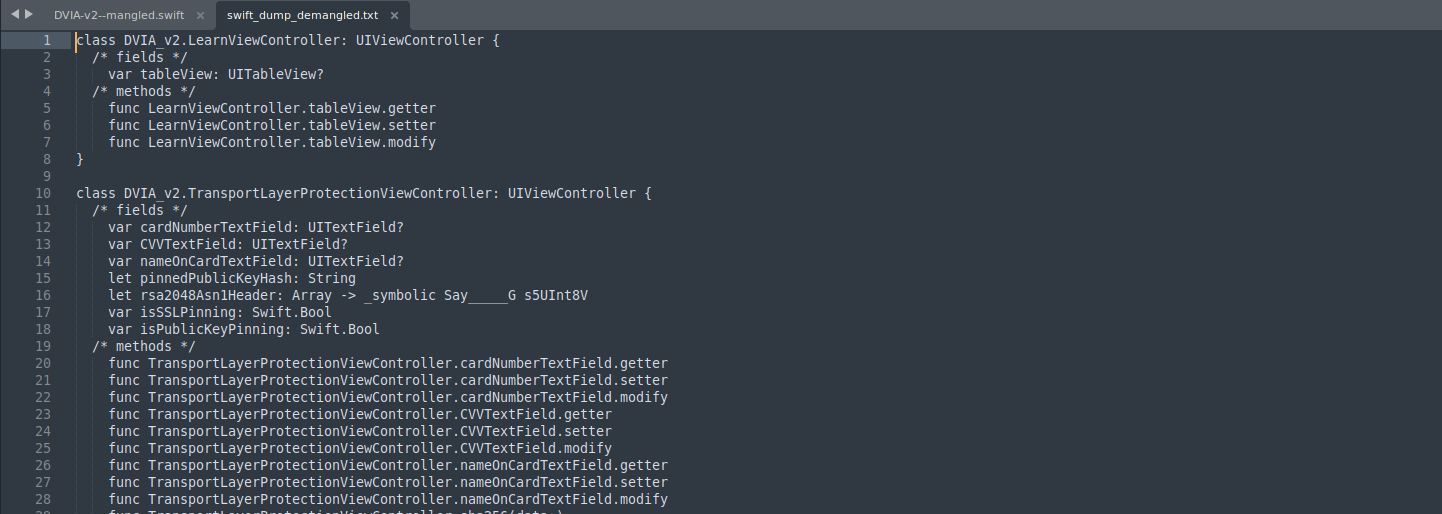
Demangling is the reverse process, converting these encoded symbols back into human-readable names. This is essential for reverse engineers and security researchers.
Using ipsw to dump all classes that belongs this function of app:
# =============================================
# iOS BINARY ANALYSIS FOR JAILBREAK DETECTION
# Purpose: Search for jailbreak detection methods in iOS Mach-O binaries
# =============================================

# Analyze Swift-specific symbols and classes in the binary for jailbreak detection
# This command examines the Swift language runtime information in the Mach-O binary

ipsw macho info --swift DVIA-v2 | grep jailbreak

# =============================================
# COMMAND BREAKDOWN:
# - 'ipsw': iOS/macOS reverse engineering toolkit
# - 'macho info': Command to analyze Mach-O binary format (iOS executable format)
# - '--swift': Flag to extract Swift-specific metadata and symbols
# - 'DVIA-v2': Target iOS application binary
# - '| grep jailbreak': Filters output to show only lines containing "jailbreak"
# =============================================

# WHAT THIS REVEALS:
# - Swift classes with "jailbreak" in their names
# - Swift methods related to jailbreak detection
# - Swift properties and variables used for security checks
# - Swift protocol implementations for security monitoring
# =============================================

# Analyze ALL classes and symbols in the binary for jailbreak detection
# This command examines the entire symbol table including Objective-C and C++ symbols

ipsw macho info -c DVIA-v2 | grep jailbreak

# =============================================
# COMMAND BREAKDOWN:
# - 'ipsw macho info': Base command for Mach-O binary analysis
# - '-c': Flag to show all classes (Objective-C, Swift, C++)
# - 'DVIA-v2': Target application binary
# - '| grep jailbreak': Filters for jailbreak-related symbols
# =============================================

# WHAT THIS REVEALS:
# - Objective-C classes with "jailbreak" in names
# - C/C++ functions related to security checks
# - Method names containing jailbreak detection logic
# - Category implementations for security features
# - All symbol references to jailbreak detection
# =============================================
This script automates the process of dumping both Objective-C and Swift classes for apps.
#!/bin/bash

# =============================================
# iOS IPA DECOMPILATION AND ANALYSIS SCRIPT
# Purpose: Automates extraction and class dumping of iOS IPA files
# =============================================

# Check if an IPA file was provided as command line argument
# This ensures the script is used correctly with required parameter
if [ -z "$1" ]; then
  echo "Usage: $0 <path_to_ipa_file>"
  exit 1
fi

# Store the IPA file path provided as first argument
IPA_FILE="$1"

# Check if the IPA file actually exists on the filesystem
if [ ! -f "$IPA_FILE" ]; then
  echo "[@] Error: IPA file not found!"
  exit 1
fi

# Extract the app name from the IPA filename (remove .ipa extension)
APP_NAME="$(basename ""$IPA_FILE"" .ipa)"

# Get the absolute path of the directory containing the IPA file
# readlink -f resolves symbolic links to get canonical path
OUTPUT_DIR="$(dirname ""$IPA_FILE"" | xargs readlink -f)"

# Create output directory using the app name as subdirectory
# This organizes all extracted content in a dedicated folder
OUTPUT_DIR="$OUTPUT_DIR/$APP_NAME"
mkdir -p "$OUTPUT_DIR"

# =============================================
# IPA EXTRACTION PHASE
# =============================================

# Create temporary directory for unzipped IPA contents
UNZIP_DIR="$OUTPUT_DIR/_extracted"
echo "[*] Extracting IPA contents..."

# Create the extraction directory and unzip the IPA file
# -q flag for quiet mode (suppresses output)
mkdir -p "$UNZIP_DIR"
unzip -q "$IPA_FILE" -d "$UNZIP_DIR"

# =============================================
# BINARY LOCATION PHASE
# =============================================

# Locate the .app directory within the extracted contents
# This is the main application bundle in iOS
APP_PATH=$(find "$UNZIP_DIR" -name "*.app" -type d)

# Check if .app directory was found
if [ -z "$APP_PATH" ]; then
  echo "[@] No .app found in $UNZIP_DIR, exiting..."
  exit 1
fi

# Construct the path to the main executable binary
# iOS app binaries typically have the same name as the .app folder without extension
BINARY="$APP_PATH/$(basename ""$APP_PATH"" .app)"

# Verify the binary executable actually exists
if [ ! -f "$BINARY" ]; then
  echo "[@] No binary found in $APP_PATH, exiting..."
  exit 1
fi

# =============================================
# CLASS DUMPING PHASE
# =============================================

# Create separate directories for Objective-C and Swift class dumps
CLASS_DUMP_OUTPUT="$OUTPUT_DIR/class_dump"      # Objective-C headers
SWIFT_DUMP_OUTPUT="$OUTPUT_DIR/swift_dump"      # Swift class information
mkdir -p "$CLASS_DUMP_OUTPUT"
mkdir -p "$SWIFT_DUMP_OUTPUT"

# Dump Objective-C classes using class-dump tool
# This extracts header information from the compiled binary
echo "[*] Dumping Objective-C classes for $APP_NAME..."
ipsw class-dump "$BINARY" --headers -o "$CLASS_DUMP_OUTPUT"

# =============================================
# SWIFT CLASS ANALYSIS PHASE
# =============================================

# Dump Swift classes using swift-dump tool
echo "[*] Dumping Swift classes for $APP_NAME..."

# Generate mangled Swift class names (compiler-generated names)
ipsw swift-dump "$BINARY" > "$SWIFT_DUMP_OUTPUT/$APP_NAME-mangled.txt"

# Generate demangled Swift class names (human-readable names)
ipsw swift-dump "$BINARY" --demangle > "$SWIFT_DUMP_OUTPUT/$APP_NAME-demangled.txt"

# =============================================
# COMPLETION
# =============================================

echo "[+] Decompilation completed for $APP_NAME"
Analysis & Patching the app by ghidra
That example on jailbreak function.
a. Extract the binary from the app.
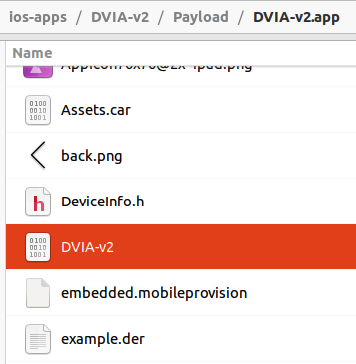
b. Load the binary in Ghidra: Open Ghidra, create a new project and import the DVIA-v2 binary.
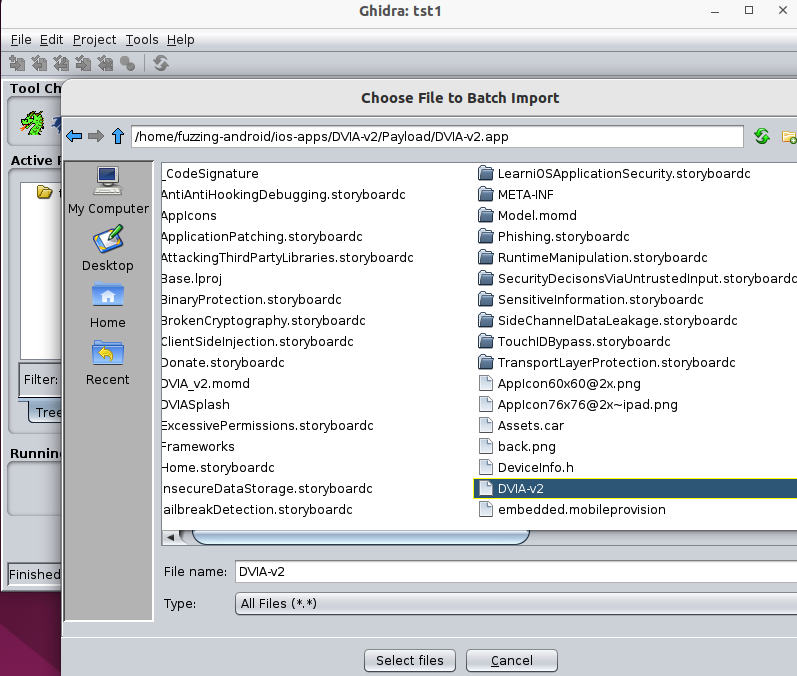
c. Double-click on the file name after the batch import finished.
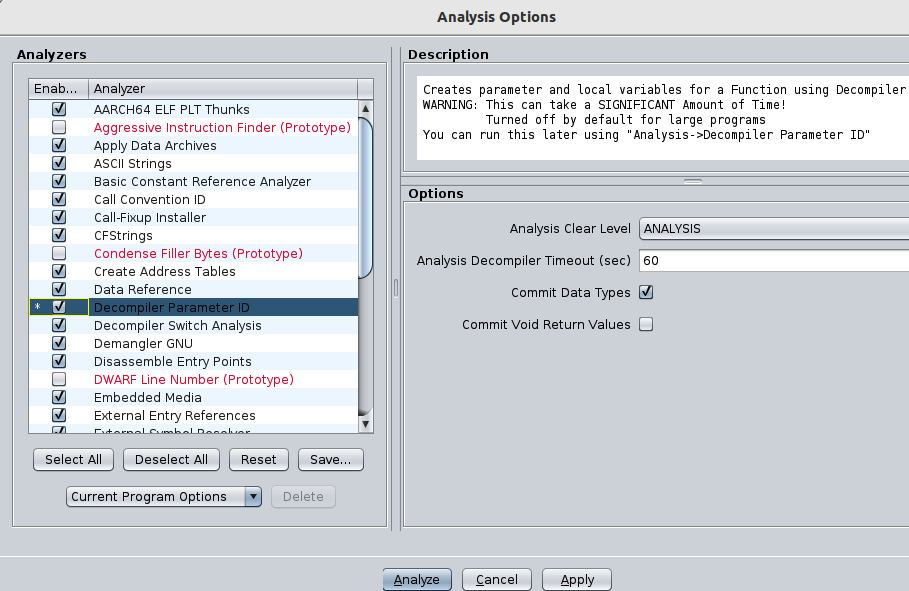
d. Click “Yes” on the question regarding analyze now in Ghidra, and “Check Decompiler Parameter ID” next to the default Analysis options, and click on “Analyze”.
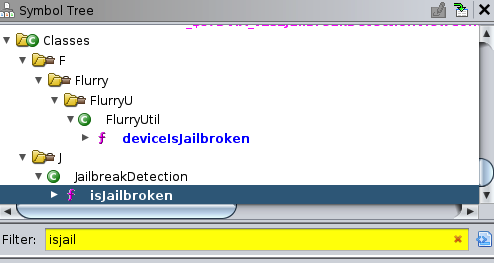
e. Search in the “Symbol Tree” for a function with the name “isJailbroken”.
f. Find the instruction that used to detect the jailbreak “Later, I’ll cover this point in the next parts of the series”.
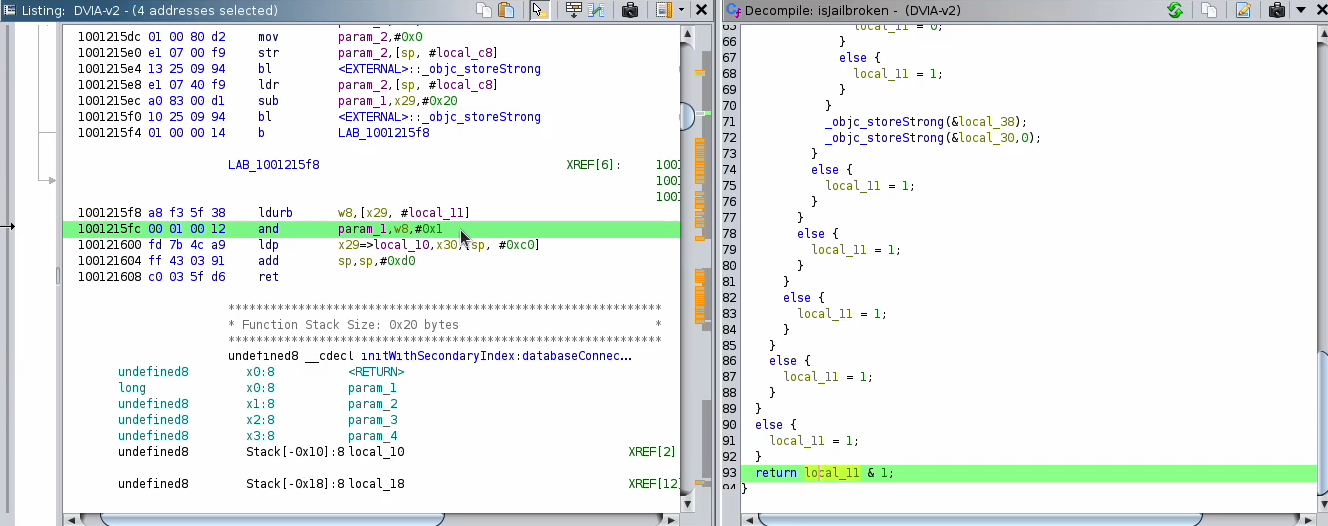
g. Right click on the matching line in the assembly code “and w0, w8, #01” -> Patch instruction.
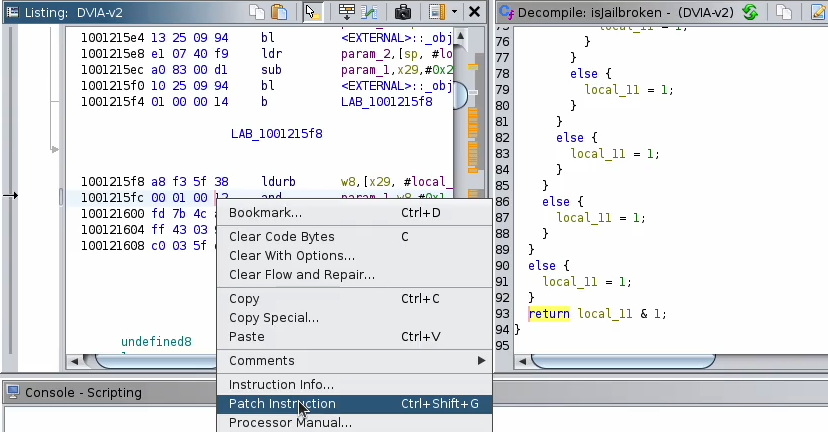
h. Change “and w0, w8, #01” to “mov w0, #0x0”.
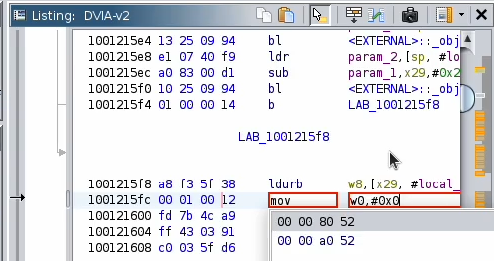
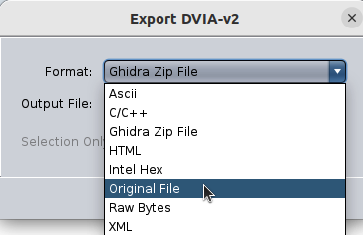
i. Save the modified binary via file -> export program, and pick “Original File”.
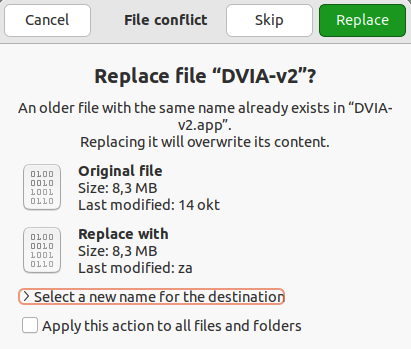
j. Replace the original DVIA-V2 binary with the patched DVIA-V2 binary in the Payload folder.
k. Zip the modified “Payload” as new IPA and install it on ios device.
# create patched ipa
zip -r DVIA-V2-patched.ipa Payload/

# push ipa package to ios device
scp /home/kali/Downloads/YourAppName.ipa mobile@[device_ip]:/var/mobile/Downloads/
Network Communication
Network communication analysis is a fundamental part of iOS penetration testing, as most apps communicate with backend services, APIs, and third-party services. Understanding how to intercept, analyze, and manipulate this traffic is crucial for identifying security vulnerabilities.
If you have the application’s source code, you can permanently embed the Burp Suite Certificate Authority (CA) into the app’s trust store. After recompiling and installing this modified version, the app will trust Burp’s intercepting proxy, allowing you to capture all HTTPS traffic without encountering certificate errors.
To prevent certificate trust errors, you can calculate the hash of the Burp Suite CA certificate and add it to the app’s Info.plist file. This whitelists the certificate, allowing the app to trust Burp’s proxy and enabling seamless interception of all HTTPS traffic.
# Convert DER Certificate to PEM Format
# x509: X.509 certificate processing command
# -inform DER: Input format is DER (Binary format)
# -in burp.der: Input certificate file
# -out burp.pem: Output file in PEM (Base64 text format)

openssl x509 -inform DER -in burp.der -out burp.pem

# Extract Public Key and Generate SHA256 Hash
# -noout: Suppress certificate output
# -pubkey: Output only the public key
# -outform pem: Output in PEM format
# -pubin: Input is a public key
# -inform pem: Input format is PEM
# -outform der: Output format is DER (binary)
# dgst: Digest/hashing command
# -sha256: Use SHA256 algorithm
# -binary: Output in binary format (not hex)
# enc: Encoding command
# -base64: Use Base64 encoding

cat burp.pem | openssl x509 -inform pem -noout -outform pem -pubkey | openssl pkey -pubin -inform pem -outform der | openssl dgst -sha256 -binary | openssl enc -base64
Key Aspects of Network Communication:
a. Common Protocols and Methods
- HTTP/HTTPS: Standard web protocols for API calls
- WebSockets: Real-time communication
- TCP/UDP: Custom protocols for specific services
- gRPC: High-performance RPC framework
- QUIC: Modern transport layer protocol
b. iOS-Specific Networking Components
  // Common iOS networking classes
  URLSession.shared.dataTask(with: url) // Most common
  URLSession(configuration: .default)
  Alamofire.SessionManager.default // Popular third-party library
  Network.framework // Apple's modern networking framework
Intercepting Network Traffic:
a. BurpSuite Setup: Building on the Burp Suite configuration we established in Part II.
b. SSL Pinning Bypass: Many apps implement SSL pinning to prevent interception.
-
Using Objection:
objection explore --start-command "ios sslpinning disable" -
Using Frida:
// Bypass common pinning libraries if (ObjC.available) { var NSURLSession = ObjC.classes.NSURLSession; // Hook certificate validation methods } -
Common Pinning Libraries to Target:
TrustKit
AFNetworking
Alamofire
URLSession delegates
Analyzing Network Traffic:
a. Static Analysis:
- Search for API endpoints in binary strings.
- Identify networking classes in decompiled code.
- Find hardcoded URLs and credentials.
b. Dynamic Analysis:
- Monitor real-time traffic in Burp.
- Trace network-related function calls.
- Modify requests/responses on the fly.
Example Frida Script for Network Monitoring:
// Hook the iOS URLSession dataTaskWithRequest:completionHandler: method
// This method is used for creating HTTP/HTTPS network requests in iOS apps
Interceptor.attach(
    // Target the implementation of the dataTaskWithRequest:completionHandler: method
    // This is an instance method (indicated by '-') of the URLSession class
    ObjC.classes.URLSession['- dataTaskWithRequest:completionHandler:'].implementation,
    {
        // onEnter is called when the method is invoked (before the original method executes)
        onEnter: function(args) {
            // args[2] contains the first parameter: NSURLRequest object
            // Convert the native Objective-C pointer to a usable JavaScript object
            var request = new ObjC.Object(args[2]);

            // Log the destination URL of the network request
            // request.URL() returns an NSURL object, toString() converts it to readable string
            console.log("[+] URL: " + request.URL().toString());

            // Log all HTTP headers from the request
            // allHTTPHeaderFields() returns an NSDictionary of header key-value pairs
            console.log("[+] Headers: " + request.allHTTPHeaderFields());
        }

        // Note: You could add onLeave here to monitor the return value (NSURLSessionDataTask)
        // onLeave: function(retval) {
        //     console.log("[+] Created data task: " + retval);
        // }
    }
);
Logs
Apps log various pieces of information which can be sensitive. To monitor these logs, tools and commands like:
# To find the device ID
idevice_id --list

# To capture the device logs
idevicesyslog -u <id> (| grep <app>)
For more advanced logging, connecting to the device shell and using socat can provide real-time log monitoring:
iPhone:~ root# socat - UNIX-CONNECT:/var/run/lockdown/syslog.sock
Conclusion
Just as Shalnark masterfully operates his Black Voice ability by inserting antennas to take complete control, we have successfully inserted our tools into the target applications to command their runtime behavior. Our systematic approach through runtime manipulation, reverse engineering, and network interception has given us total oversight of the application’s inner workings.
Quote from Shalnark: Once my antenna is in, the target is mine to control. I can make it do anything I want.